First off, I figured I'd give you something interesting to do: Send the older you a letter.
Or, in more specific terms: You write up something to tell yourself oh, maybe five years from now [or however long you choose - you pick the date] and then you wait. And when it comes around to whatever date you decided on, you'll get an email [to whatever email you specified] from the younger you.
I sent mine to November 20th, 2013, which will be the day before my 20th birthday. It's only a few years from now, but I figure at the time being, that's good enough.
So, go check out >FutureMe<, and thank StumbleUpon once again for something awesome.
On to other news, I'm finally finished with staining/burning all those papers. And I figured just in case, I'd throw in a mini-tutorial. So, here we go, pictures included. [Not my best, mind you. I wasn't going to bother and then I thought I might as well be even more productive and...well, here.]
There's more ways to go about this than you might think. From tea-staining, to coffee-staining, to burning, and multiple options for each, you might want to experiment a little. That's what I did, and what I finally ended up doing was using a candle to burn the edges of each individual piece of paper, and staining them using coffee. Really quite happy with the result, myself.
>DruidChickz<, that epically talented artist on deviantART I mentioned a few days ago [the one who was making her own notebooks, and gave me this whole idea in the first place] let me know how she did her own: Take a really black cup of coffee, paint the pages with it, and then blow-dry them with a hair dryer. Simple enough. I combined her option with a couple others.
1.) Get paper. She and I used simple white printer paper. [the pictures below might confuse you, size-wise: I didn't want huge papers, so I folded a bunch in half and cut them, leaving the edges jagged. Cool effect, but it goes a little unnoticed once stained/burned.] I can't say how this will work with any type of paper, but I had no problem with what I used.
2.) You're choice - Either burning or coffee-staining. I did both, and I tried doing each first and second, and the order I did them didn't seem to make much difference, so for the sake of listing we'll go with burning first: I just used a simple candle. [Lighters have gotten the best of me, so I used a match to light it. Just thought I'd through that out there. Do be careful. Or you know, don't. If you use a match, have a cup of water nearby to dunk it in after.] I'd suggest doing all of this in a bathroom or kitchen since it can get kind of messy with the coffee, and it's best to have water around just in case you, ya know, light something on fire.]
Simple hold the paper about an inch above the candle flame, moving around until you get the desired color you want. It almost undoubtedly WILL catch fire a time or two - personally, I like this, because it creates a better effect here and there. Try to keep that minimal though, and don't leave the paper over the flame in one place for too long, just let it darken slightly and keep moving. You can do this to the entire paper, but with my experimenting, that just takes too long, leaves the paper too crunchy, and doesn't wind up looking as good. Play around and see what you like. [When it does catch fire, you can either quickly run it under water, or just blow it out. I opted for the second option more often.]

3.) Coffee-staining. The best way to go about this, apparently, is by using really black coffee. I didn't have extremely black coffee, and it still turned out to my liking. [Again, experiment. Blacker will probably be a little better, but do what you can.] I simply dipped a paintbrush in coffee and proceeded to paint the pages. That way seemed a little too....light, for my liking, so after a couple tries that way I started just dumping a bit of coffee on each sheet and spreading it around. [Don't make it too heavy and don't sweep your brush too hard - this IS wet paper and it rips easily; be gentle.] I had each sheet laid out on a hand towel, so as to not get coffee everywhere. Again, keep all this somewhere within easy clean-up range - coffee stains like a bitch [which is a good thing, in this case], so make sure you don't use anything you wouldn't want ruined.
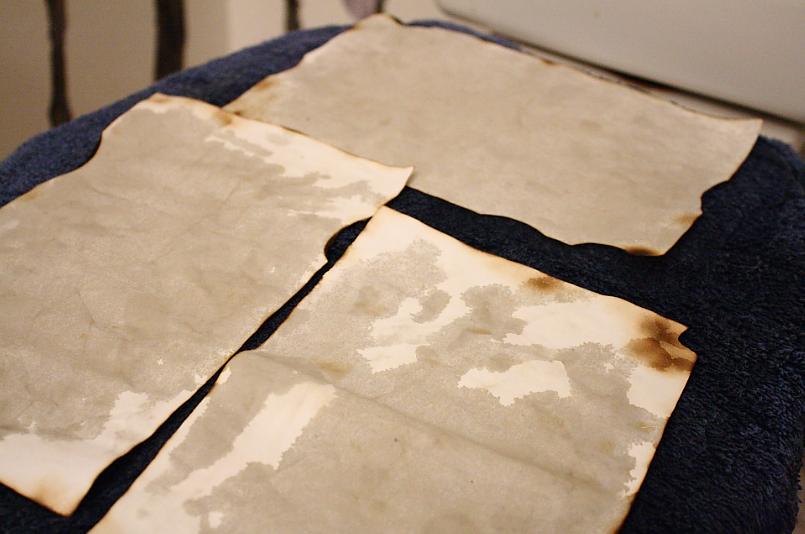
Let it sit for a bit to dry enough to pick up. It's okay if it's a little uneven, just make sure the whole paper's covered. [Quick note: The pieces below were the last I did. I had some coffee left over so I did the backs of these, that's why they're even more uneven. The one towards the top of the photo is how your own should be, as a whole; fairly evenly wet. If you find the pages aren't dark enough only staining one side, then stain one side, dry the sheet, and flip it over and stain the other side as well.]

4.) Once dry enough to pick up, carefully hold up one sheet at a time, blow-drying it with a hair dryer. Mine's a simple one with only two settings [low and high] and I kept it on the low setting. It takes a little bit, but paper dries quickly. Just dry it like you would hair - keep it moving, not too close. If you like, feel free to crumple the paper a little when still damp [not too wet, remember, or you'll rip it] - creases are cool, right?

Aaaand that's about it. Pretty E-Z mode. Finished thing for me wound up looking like this;


Obviously, if you choose to do this, you don't have to do it exactly how I did: You can opt to merely stain the pages, just burn the edges, a combo like I did, or anything else you or Google might think of. It's just a cool, simple way to make paper look old/worn. And essentially free, too. I did it over a few days, and I only did about 25 sheets. Expect to spend a little time, but nothing too horrific.
Note: As mentioned, you can decide to do either the burning, or staining first. I didn't find it made much difference, but if you stain them first and burn after, the fire tends to bring out a cool effect in parts of the paper due to the stains. Really, up to you. Try it out.


0 comments:
Post a Comment